Thursday, September 27, 2012

TNT Thursday; Quilter's Roll Clips

 I used to have someone else quilt my quilts for me or I'd try them at home with my regular foot.  They were always such a pain that I resisted picking up the chore of doing it myself again.  Recently I discovered the value of a walking foot and the fun of free motion quilting.  I am in love with doing it myself now and may only send off the really huge ones.  I've found with a little difficulty I can quilt a twin sized at home but I have yet to try anything bigger.  While I was at JoAnn's during coupon commotion I found these Quilter's Roll Clips.  I was excited that something so cheap (I got them for $5) could make my quilting experience better.  I tried them out today and I'm linking up with TNT Thursday with Melissa at Happy Quilting.

Here are the Quilter's Roll Clips in the package just in case you didn't know what they might look like.

I got them out to use them and my cute three year-old Amelia thought they were big earrings.  To give everyone a laugh I tried them on.  I think I could totally rock these given the right outfit and they actually stayed on pretty well, lol.  Not really, well they did stay on but I wouldn't wear them.

Here they are doing their proper job.  They came six to a package and I probably could have used less and maybe I'll do three to a side when I'm working on the middle.

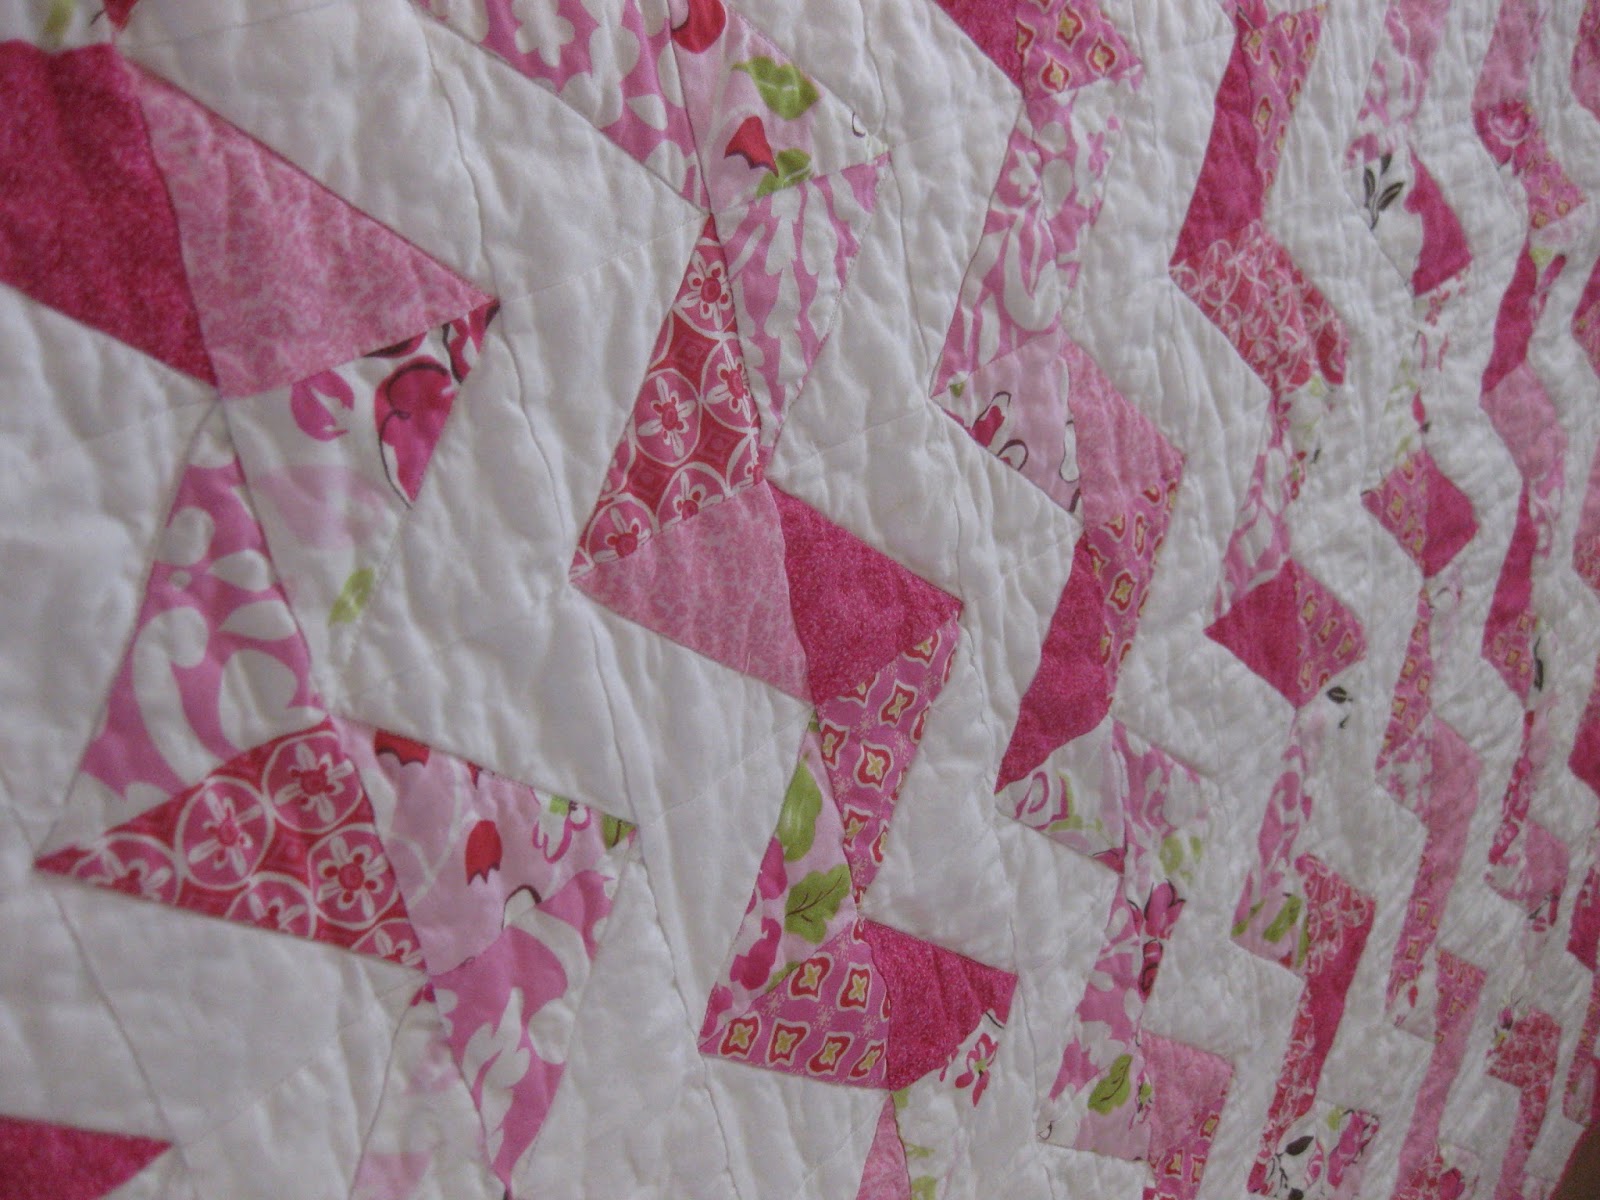
Tightly wound like this gives me so much more room!!  I had no idea my machine could be anything other than a miserable quilt trap!  It made working with it much easier.  I was using the walking foot at this point and needed to pivot a lot!

While in the middle of quilting with the walking foot I thought, "This is dumb!  I should try it with my FMQing foot."  The lines weren't as straight and it took a little getting used to but it was much easier!  I've never tried straight lines with my FMQ foot.  I'd just used a regular then a walking foot before.  This kind of quilt with lots of turning seemed just right.  I'm outlining all the curves in the swirl pattern.  While working with this I found the roll was better positioned off to the side of my machine but I still liked the clips because it kept it all contained.

I loved the clips and would recommend them for keeping this more orderly.  If nothing else they make a fabulous fashion accessory!  Thanks for stopping by!

Wednesday, September 26, 2012

WiP Wednesday: The Smattering

 I have a bunch of random things I'm working on right now.  I'm trying to get a lot done before my Sister's visit in less than two weeks.  My craft room will be converted to a guest bedroom while she and her family are here and I wanted to get a lot of my works in progress finished up before I have to move my sewing table out.  With a bunch of different crafty things all in various stages of completion I'm linking up to WiP Wednesday over at Freshly Pieced.

As always, I love to start with the finish.

I finished up my HST pink quilt for my friend's baby who was born on the 7th of this month.  I adore how it turned out and her super-cute and happy reaction to seeing it completed.  To see more pictures, even one of her sweet baby, follow this link.

Now on to my quilting work in progress...

I also started quilting my Christmas quilt.  I began this quilt back in January and finished the top in February then it just sat there on the back burner.  I got excited about in again in July when I attempted to spray baste it.  That was an adventure found in this post.  Since it was a Christmas quilt I really didn't feel any need to rush it.  Now I'm wanting it done before my craft room briefly becomes a guest bedroom.  It's been sitting in a corner on the floor and I really want it out of the way.  Thus I began the quilting.  I'm going in the ditch around the swirls.  In this block I outlined all the red pieces.  It took me about 30 minutes and there are nine of these in the quilt.  It should go pretty quickly and I might even have it done before my sister gets here in about ten days.

Finally a bit of crochet...

I have really big feet.  Seriously, they are a women's size 13.  Didn't know women's sizes went that large?  Well, they typically don't.  Most of my shoes are either really expensive or men's shoes.  It seriously hampers my cuteness let me tell you.  Another downside to large feet is that I can't really find cute socks that fit me.  I adore wearing cute socks!!  Women's socks make my toes curl over and it's quite uncomfortable.  For years I have sacrificed for fashion but no more!!  I have learned how to crochet my own socks!!!  I'm so excited and the pattern even has an adjustment for huge feet like mine!  Here's my little started bit.  This is after a few hours working on it while hanging out with my kids.  I kept trying it on and my hubby would laugh at me saying he didn't think it was big enough yet.

I haven't has as much time as I'd like to work on them but they are getting bigger.  The yarn is self-striping which is pretty awesome!  I found so many other adorable colors I can't wait!  Although, shortly after I began these socks I went to the men's section at Target and they actually have some super-cute socks on clearance right now for about $2.  They even had some with pink!  I snatched up three pair of cuteness to tide me over until I finish these up, which may not happen until the spring at this point!
Thanks for stopping by and reading about my projects for this week!

HST Pink FInish

I'm excited to post about the HST Pink finish!  It was such a fun quilt to make and my first attempt at an entire quilt of half square triangles.  I chose a chevron pattern and made it kind of scrappy and while I'm typically not a fan of scrappy I just adore how this one came out.  Here's all the details the bold links lead to other posts related to this quilt...


In early April I joined up with the One Thing, One Week Challenge hosted by Amy at Amy's Creative Side.  I did it to get motivated on my Skill Builder Sampler blocks but as a bonus I won the giveaway for the week.  It was this fat quarter bundle of super pink fabric.  I was excited to get it and then it promptly sat on my shelf for nearly the next five months.
 Enter my cute very pregnant friend.  I was visiting at her house and mentioned that I could make her a quilt for her baby.  She got adorably excited and I couldn't wait to get started.  She was having a cute little girl in two weeks and I was excited to make her a quilt.  I knew I was going to use the pink bundle but I had no idea what to make with it.  I bounced a few ideas around and landed on a bunch of white and pink half square triangles.  I had to supplement a little with some pink from my stash and I already had some white.  On August 28th after only 60 minutes on my Accuquilt Go! I had all 560 little 3" triangles cut.  Hurray for the Go!

I had a lot of interruptions with this quilt.  I had to finish my Tetris quilt, then I made some cute booties and a hat for my other friend.  Her baby was born on September 7th and by the 19th I had all the squares pieced together.

It went pretty quickly after that.  By the next day, the 20th I had the whole top pieced.  I had a bit of a hard time deciding on quilting but I decided to stitch in the ditch along the pink edges to accentuate the zigzag.  I asked for advice here on my blog and on facebook and nearly everyone liked that way better.

I did the quilting on the 23rd and 24th and after the binding and a quick wash it was ready to deliver on the 25th when I was visiting my friend at her house again.

Since I finished it at nearly 11pm I didn't have the lighting I needed to get a good picture.  I brought my camera and took some photos at her house. It worked out nicely because I got to take a picture of her adorable baby on the quilt I made for her.  Isn't she just precious?!  She was even dressed to match!  I just love making projects for other people especially when they are as excited as my cute friend was over it!
I'm linking up with Fabric Tuesday over at Quilt Story.

Thursday, September 20, 2012

TNT Thursday: A HST Pink Quilt

 I'm excitedly linking up with Try New Things Thursday hosted by Melissa at Happy Quilting.  I have never before made a quilt of all half square triangles.  I'd made a few quilts that had HST in them but never a full one and so I was excited to conquer this new, to me, thing.  Piecing the triangles was kind of monotonous but the rows went together really quickly. As of my post yesterday I only had 112 of my 280 squares sewn together.  Twenty-eight of them were sewn into two rows.  I worked on it through nap time and a little after the kids came home from school and I finished up the whole quilt!  It was pretty impressive.

Here's the completed quilt top.  I just LOVE it!  It went together so fast and the scrappy feel is just what I wanted.  I'm typically not great at making scrappy but I put all the pieces in a big bag and tried not to look as I picked them out.

Now comes the debate of how to quilt it.  I'm totally at a loss and would appreciate help.  I narrowed it down to two different choices...

This is the first choice.  I'd use this template with spray chalk to transfer it and then free-motion quilt it.

IMG_0856
This is the other option.  I found this quilt HERE at JAQS Studio.  I love the way it looks and emphasizes the zigzag-ness of it all.  It would be fairly easy to do with my walking foot.
 So what do you think?

Wednesday, September 19, 2012

WiP Wednesday: A Bit of Pink

 I have returned to my former ways of being a monogamous quilter.  Right now I'm working on a HST quilt for my friend who had her baby not quite two weeks ago.  I like to have them done before the baby is born but in my defense I didn't even plan on giving her one until ten days before the baby is born so I think I'm doing rather well.  This is my favorite work in progress right now and I'm linking up with Lee at Freshly Pieced.

I was so excited when I finished piecing and pressing all those HST together.  There are 280 squares now.  I really had no idea what I wanted to do with them.  This is my first time making a quilt of all HST!  There are so many different layouts to choose from!  I narrowed it down to four different ways and then my hubby helped me pick the winning layout.  It's a scrappy chevron.  There's a picture at the bottom of what I've put together.

Chain piecing is my new friend but I admit it's kind of a struggle when I forget how many I've pieced together.  To help me keep track I cut them apart after I have seven sewn together.  Seven makes one row of this quilt which is 14 squares across and 19 down.  I've made 7 of 10 odd rows and 1 of 9 even rows.

I couldn't resist taking a break from the chain piecing and seeing what it will look like in the end.  Pardon the glare!  This is about 42" across and will be the final width.  I love the scrappy look this time even though I'm usually not a fan.  I think it helps that all my white pieces are the same.  I can't wait to see it get bigger so I'd better get back to work!
Thanks for stopping by!  Check out more fun projects on this weeks linkup at Freshly Pieced!

Sunday, September 16, 2012

Love It, Pin It, Win It! - LIttle Rays of Sunshite


 The Moda Bake Shop is one of my favorite places on the internet.  There are so many different free tutorial available for creating everything from quilts to backpacks to purses.  Currently they have a contest going involving two of my favorite things, Moda Bake Shop and Pinterest.  As part of the contest we are to pin our favorite recipes with the tags: #modabakeshop #modafabrics #lovepinwin.  There was another option where we could blog about our favorite recipe for another chance to win.

It was nearly impossible for me to pick my favorite recipe!  I have a full pinboard stuffed with nearly all Bake Shop quilts.  In the end after much indecision I landed on  Little Rays of Sunshine by Katie from Calico Hutch.  


I love how it is the zigzag pattern I love (and am seeing nearly everywhere these days) but with a bit of flare involving the stripes and triangles!  It's so cute and I can't wait to give it a try!


Wednesday, September 12, 2012

Let's Get Acquainted!

Plum and June

I've been excitedly waiting for my day of the Let's Get Acquainted blog hop to come around.  There have been so many fun stops along the way!  Earlier this week there was Anne from SpringLeaf Studios and Kristy from Cotton AddictionToday I share the spotlight with Chelsea from Pins and Bobbins.

In honor of the blog hop I wrote a fun tutorial on how to make this Handprint Crab Mini.  That's in the previous post.  This post is designed for you to get to know me and my blog a little bit better. 

Here's the link to the tutorial for this mini.  Isn't it cute?
I think the best way to get to know the crafty side of someone is to look at what they've made.  I love quilting.  It was my first crafty obsession.  Then over seven years ago while on bed rest while pregnant with my first child I picked up crocheting.  I'm pretty obsessed with both at this point.  There are some collages with links below but if you'd like to check out all of what I've made either click on the tabs at the top or follow the links here for Completed Quilts/Top and Completed Crochet Projects.


1. Hexagon Park   2. Double Wedding Ring   3. Owl peter/Paul   4. Plaid Apple Core   5. Tetris   6. Cartwheel   7. Disappearing Walk in the Woods   8. Argyle   9. Appliqued Animals.


To date I've made 41 quilts/tops.  It was hard to narrow it down but these are sure my favorites.  Now on to crochet projects.  I love crochet because it is so fast and there is no limit to what you can create!


1. Woven Scarf   2. Necklace   3. Viking and Crab hats   4. Dragon   5. Mama and Chick Pot Holder   6. Sock Monkey Hat also Here  7. Crochet Christening Gown (no. 2)   8. Homestyle Ripple Afghan   9. Christening Gown   10. Self-folding Hot Pads   11.  Preemie hats.


Another great way to get to know someone's crafty side is to see where they work.  This is where all the magic happens...


My sewing table.  Yeah, I totally cleaned it off for this picture.  It's not typically this clean but it's so nice to have this much space!
This is my paper-crafting area.  I love the shelves to store all my things!
I adore the big windows that let all the sun in but they also made it really bad for this picture.  It's a nice little space and with four kids and a hubby I'm lucky to have this much space to myself!
 Here's a bit of Q & A for your reading pleasure...

      - How long have you been quilting - I started with a Sunbonnet Sue quilt in 1997, I think.  It's hard to remember that long ago.  I was 14 going on 15 and really wanted to try quilting. With a fun quilt book in hand and many many cute fabrics I was ready to begin.  Or so I thought.  My Mom is not a quilter and I know of no one else in our family that attempted quilts before me.  Although I do come from a long line of women who sew they do mainly clothing and I even have an Aunt that makes and alters wedding dresses (she's AMAZING!).  This lack of quilting background really put me at a loss when quilting.  I had no idea there was such a thing as a rotary cutter or that it could be combined with a ruler and mat to create more accurate cuts.  I had a ruler, a pencil, and a pair of scissors.  My seams really didn't match up very well and the whole thing had a bit of wonkiness to it. I'm sorry to say I don't have the quilt or even a picture of it but I do have a pillow I made to match the quilt.  For the whole story on that go here.

       - Favorite quilting tip(s) - As I learned while making my first quilt you really need to have the right tools for the job.  That means having a rotary cutter, mat, and ruler.  Make sure your blade is sharp enough to cut.  Make sure you have enough thread that matches what you're working on.  Also, take your time.  Sloppy cuts = sloppy quilts.

       - Favorite blogging tip(s) - Remove the word veri-freaking-cation!  Everyone HATES having to tell if that's a EQGS or an EOGS.  Save them the trouble and just take it off!  I removed mine shortly after I started my blog and I've never had a spam comment.  As an extra precaution I've put up comment moderation for posts older than 30 days.  It seems that when I had problems on my other blog from spam comments it was always on the older posts.  Also link, link, link.  It's the easiest way to cite a source for anything and to help people find other posts in yours or others blogs.  It takes a bit more time but it's so worth it!

       - Favorite fabric (or wish list fabric) - Ruby by Bonnie and Camille for Moda jumped into my head first when I saw this question but there are a lot I'm loving right now.  I find this question amusing because it wasn't until October of 2011 that I even knew that designer fabric existed.  I'd never heard of Moda or Michael Miller or any of the other well known companies that I'm in love with now.  I always bought my fabric at Joann's or Hobby Lobby.  I never even thought to look at who made it I just needed to know if it matched.  I'm floored by the quality of the more expensive lines and I'd be hard pressed to go back.

       - Favorite craft book - I haven't bought a craft book in years!  I get most of my patterns online now and download them to my Nook or print them out.  Although the book I've found the most useful over the years is "I Can't Believe I'm Crocheting!"  It has so many pictures and runs though step by step.  I'm an avid crocheter now and I may even love it more than quilting thanks to this book.


You can get this book here or try the updated version here.

       - Favorite book (or book you are currently reading) - I adore Fahrenheit 451 by Ray Bradbury. It's quintessential science-fiction and even though it was written in 1953 he captures so many of the nuances of our day.  He predicted so many of the technological advances it's mind boggling.  In the book the people, in an attempt to create a balanced society, have banned books.  They feel without them people will be on the same level intellectually.  Thus, Firefighters instead of putting out fires start them to burn the books they find hidden around the city.  The novel follows one such firefighter as he struggles though life in this environment.

       - Favorite children's book - Who could pick just one?!  I'm loving Llama Llama Mad at Mama right now.  The illustrations are priceless and I love how it gives a glimpse into my child's mind.  The book follows little Llama as he goes to the store with his Mama.  It tells how he feels and what he experiences during the trip.


       - Favorite quilting tool - Again with the hard to narrow down!  I think it's got to be my rotary cutter.  How did I every survive without it?


       - Favorite music to listen to while quilting - I adore the various albums from Glee.  Seriously great music all in one place.  I find myself singing along while I happily work away.


       - Favorite TV show while hand stitching - I find that I am MUCH slower if I try to watch anything while hand stitching.  I just stare at the screen and have the needle limp in my hand.  Occasionally I'll pick up something I'm working on while watching TV but I don't turn it on while I'm quilting on purpose.  Instead I listen to music, see the above question, or enjoy a moment of silence if my four kids are asleep.


       - Binding - by hand or by machine? - I used to ALWAYS do it by hand.  Then I discovered machine binding (it's my lack of quilting heritage striking again) and it's pretty difficult to go back.  I bind by hand if it really needs to look perfect or if there are too many curves in the edge like this quilt.


       - If I'd only known - what you wish you knew about blogging before you started your blog - To take more pictures!  Before my blog I never took pictures during a quilting process and I usually only took one of the finish.  It wasn't always in the best light and didn't show off the quilt as it could have.  Now I know and I take all kinds of pictures during the process and when it's finished.  I take from different angles and in different light to make sure I capture its fabulousness for posterity.


Thanks for stopping by and sticking with me for this long post.  I tend to be thorough when blogging.  Be sure to keep scrolling or follow the link to the tutorial.  Also check out my blog hop buddy Chelsea from Pins and Bobbins.  Since my first ever attempt at a blog hop post is definitely trying a new thing I'm linking up with TNT Thursday by Melissa over at Happy Quilting.  I also made the collages in my blog and I've never tried that before.  Hurray for new things!

Handprint Crab Tutorial

As part of my stop on the Let's Get Acquainted Blog Hop I decided to write up a tutorial.  I've never done one this detailed before so I'm kind of nervous/excited about it.  I got the idea for this hand-print crab here.  The original was done with paint on regular paper but I easily converted it to fabric.  I'm linking up with the Oh Sew Baby! over at Fort Worth Fabric Studio Blog. Ready?  Let's go...

The is the end result you're going for.  It's 12.5" square.  The original had a mouth but I wasn't in love.  You can add one if you'd like.

Here's what you'll need.  One piece of paper - a pen or pencil - scissors - fusible web for iron on applique - sew on googly eyes - 3 fat quarters (one crab color, one sand color, and one ocean background) - a scrap of batting - matching thread.  Optional: embroidery thread for mouth and a marker.

Let's start by making the hands that will become the crab.

Step One: Grab your favorite small person and trace their hands with the pen or pencil onto the piece of paper.


Optional Step: Go over the tracing with marker.  This step is not required but it does make the next step a bit easier.

You can see the difference the marker makes while trying to trace the hands onto the fusible web.

Step Two: Trace the hands onto the paper side of the fusible web.  Typically I use pencil because it doesn't smear but I needed to use pen this time to make it show up in the pictures.  You end up peeling off the paper in the end so the smear doesn't really matter it's just a personal choice.

Step Three: Roughly cut around the traced hands.  This step doesn't have to be perfect in fact it's easier to cut it out like this and do the precise cutting after it's ironed on.

Step Four: Turn your iron on to the hottest setting with no steam.  Once your iron is ready make sure you iron your hands on the WRONG side of the crab color fabric.  That way when you peel the paper and iron it on to the background you have the right side facing out.

Step Five: Carefully cut out hands along the traced line.  If you notice a bit of wonkiness to your tracing you can trim it at this point to make it the perfect hand shape.

- Now your hands are all ready to go and it's time to create the background.  This is the easy part!


Step Six: Out of the sand color cut a piece that is 5" by 12.5." I used a fat quarter for this and cut the piece 5" by 18" then trimmed down to my needed 12.5."  Doing it this way left a larger scrap piece to use on the back side later. 

Step Seven: Out of the ocean print cut a piece that is 8" x 12.5"

Step Eight: Sew the sand piece to the ocean piece and press the seam either open or toward the ocean piece.  I hate pressing open (I always burn my fingers) so I pressed toward the fishies.

Step Nine: Peel the paper from the back of the hand piece.  This part can be a bit tricky to get started.  It really doesn't matter where you start the peel from so anywhere that you can get it to separate would be good.

Step Ten: Get the hands just where you want them to form the crab.  Make sure your iron is on all the way hot and again with no steam.  Iron the hands onto the background.

Now you're ready to stitch around the hands to secure them to the background.  I like a zigzag stitch and I do it at 4.0 width and 1.0 length.  If you're not sure what you like get a scrap of fabric and try out a few stitches with different lengths and widths.

Step Eleven: Outline the hands with the zigzag stitch.  I found it easiest to start at the bottom where the two hands go together and then go clockwise around the hands.  I finished up by going through the center of the crab where the top hand overlaps the bottom hand.  Wherever you start you need to make sure you stitch over every raw edge.

Optional: If you'd like your crab to have a mouth now would be the time to sew it on there.  I didn't like the smiley face so I left it off.  My family and everyone else I've asked has been totally split over the whole thing so it's really up to you.  There are eyes too but I sewed those on last so they wouldn't get in the way of the quilting.


Now it's time to quilt and bind it.

Step Twelve: Cut a background piece (I used the sand color) and a batting piece slightly bigger than your block.  Since the block is 12.5" I cut mine at about 14.5"

Step Thirteen: Once sandwiched quilt as desired and trim off the excess.  For my quilting I chose to free-motion quilt around the hands and then do a bunch of wavy lines everywhere else making sure to stop at the hands.

Here's the back side.  I really think it makes the hands pop!  Those wavy lines sure are fun too!

Step Fourteen: Bind and sew on the eyes.  I bound it in the crab color cutting four strips 2.5" by 18"  I had nearly one strip extra but that's better than it being too tight.  I sewed on the eyes last because I didn't want them to get in the way while I was quilting.

And you're finished!  One super cute crab animal made out of your favorite small person's handprints.  There are many variations to this.  You could also do owls, elephant, giraffe, eagle, and so many more.  The only limit is your imagination.  Try pinterest or a quick Google image search for more handprint craft ideas.

Since this is my first step-by-step tutorial I'd appreciate any feedback you may have to offer me. Thanks for stopping by!  Be sure to stop by the other hop stop today with Chelsea from Pins and Bobbins.